Saturday, January 29, 2011

Aquaponics - Wedgies

Before starting on the wedgies, thanks to rain I am able to collect more than enough water to fill up the tank to the max.


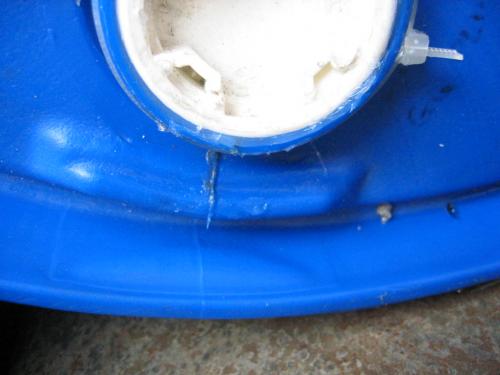
After having it filled, I can now very confidently say that the stress at the opening is minimal if any and 100% no leak at the screw cap holes or any other part of the tank. I tried rolling the tank but it need lots of effort so there is indeed a need for some kind of stopper.

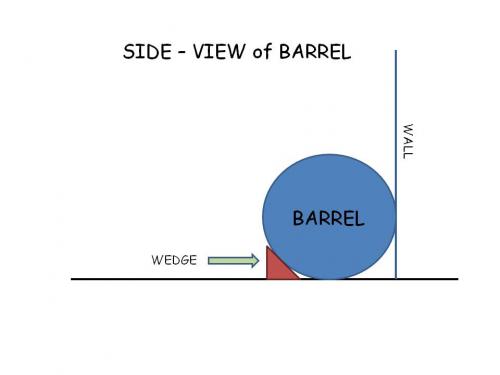
After consideration, decided on the wedgies .... as Sjoerd (member of Garden Stew) said it "THE best idea in terms of cost and simplicity."


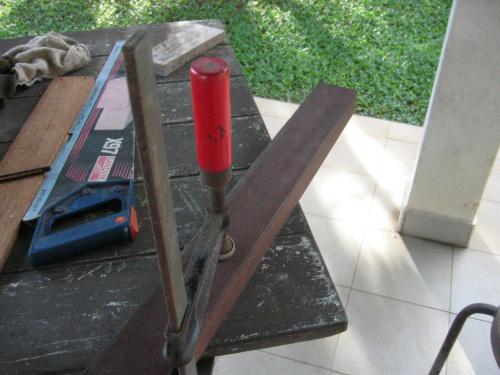
Found a piece of left over very hard wood beam which was used in the renovation of my house about 20 years ago and so no extra cost but high value!


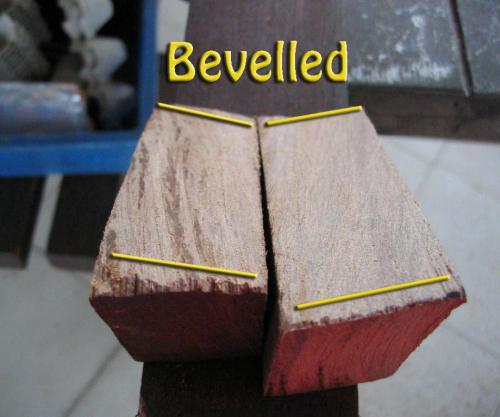
This species of wood is rated as the second most hard wood from the tropical rain forest. If any termites dare to take a bite at it, I am sure they will have to go see a dentist after that!! Having not saw a piece of hardwood for a long time and with my glasses on for the first time, the end result is a beveled edge instead of a true 90ยบ flat face. A contoured or concave face would be great but due to my laziness ........


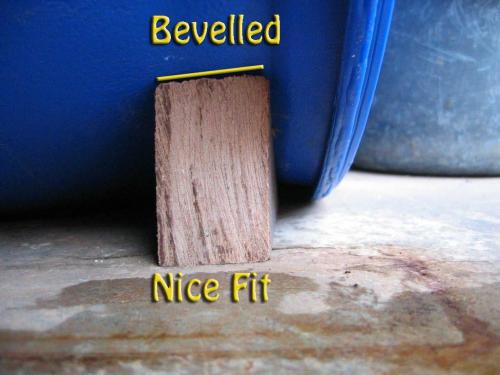
Anyway this error actually worked in my favor because of the sloping part of the wedgies actually fit nicely to the tank. With a little tap the wedgies fitted snugly into position and it is almost impossible to remove it after that.


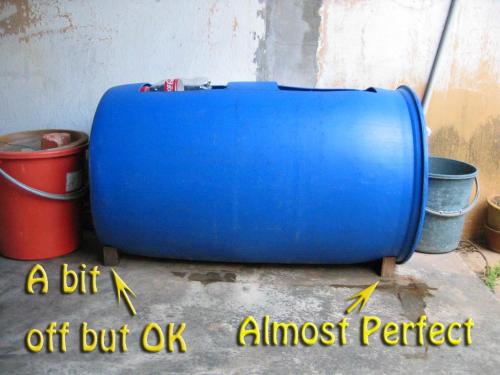
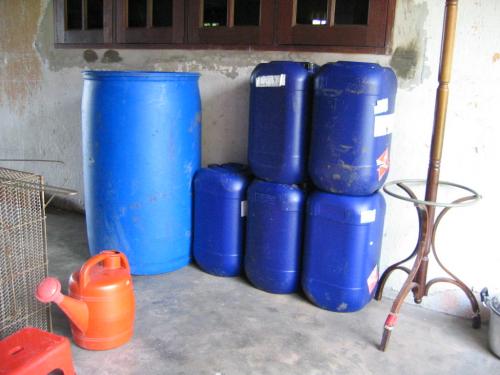
Well Jerry, it is the barrel against the wall with a couple of wedges. It is really stable and neat.


Aquaponics - Anti-Roll

Jerry, a member of Garden Stew had been following me in my project suggested that I should have some kind of barrel support so that it would not move ....... I have been looking at it but wasn't really able to decide. After sitting down in front of the barrel and starring at it off and on for about two days, these are my thoughts.


This look very secure but ..... err is this like over doing it?


I guess this might be a better solution because the cage is not at a tangent to the circumference of the barrel so it actually stop it from moving I think.


The most simple form just like a car wheel stopper used when changing a flat tyre. Everytime I try to think for more solution the wedge always come to my mind. I think this is the best because it is simple to move and simple to apply. The cost is minimal.

Anyway it is raining again now and I would be able to fill up the barrel tomorrow with the water I am collecting now. With a fully filled up tank I would be able to see how the wedges perform in real situation.

Tomorrow WEDGEY day!!!

Thursday, January 27, 2011

Aquaponics - I'm Pleased ....

By noon today, the silicone sealant would have cured for more than 24 hours.


Filled it with the rain water collected yesterday and managed to fill up 50% of the capacity.


Check out my handy work and there is no leak. Turn the drum around so that the other hole is checked too to ease my my mind that it is OK too. yes it is OK and is keeping my fingers crossed because this is just initial.


6 hours later after my lunch, afternoon beauty sleep and weeding about in the mini farm, I was a bit nervous while keeping my fingers crossed as I approached the half filled tank. Hey it is as dry as a bone ..... I did it.

I am pleased .......


Wednesday, January 26, 2011

Aquaponics - The Cut is Done!!!

Yesterday lost all my photos in my alzheimer suffering camera but early this morning I was rewarded with sky juice fresh from the sky.


It had not rained for more than 2 weeks now so it is indeed pleasant to have it but it overstayed it's welcome and it is still drizzling now ...... almost midnight now. Anyway the timing couldn't be better because tomorrow I would need the water to test out if it is still leaking after redoing the leaking area yesterday evening.


This time instead of one cable tie, I used two - one at the base and another at the rim. This was done after the drum was cut.


The design for the opening was changed after Jerry made some very important comments on my last posting. Thanks Jerry, I think the band in the center should be strong enough, if it is not I guess I'll have to reinforce it.


The inside of the access hole is not flat so I am not able to sealed it with a gasket. The best way I know how is to silicone it. I did it for both the access holes practising better safe than sorry.

The silicone curing time is 24hours and since it had been raining and raining the whole day today, I decided to let it stand for another day before proceeding to do the leak test.

The drum is made in Germany and I guess it had to meet with some kind of standard in relation to the welded part of the top cover. Knowing that the drum is made in Germany gives me more confident that the top cover would stay in place. The tear at the access hole must be caused by over tightening of the screw cap. The O-ring for that cap is missing and I had to use excessive force to open it when I got it.

Keeping my fingers crossed for the moment of truth!!


Saturday, January 22, 2011

Aquaponics - The Crucial Cut ....

I did a leak test on the 200 litres drum and found one of the access hole is leaking. I could kick myself for not doing a visual check before accepting the drum!


There was a crack at the joint of the moulding of the drum due to excessive forced used to shut the stopper. I repaired it from the outside with silicone rubber and kept my fingers crossed that the job is done.

I did another leak test this morning and ...... arrguuhh!!!! water is still trickling out. On closer examination I concluded that the sealing must be done both on the inside and outside.

In order to reach the area that is having the leak from inside I'll first have to make an opening large enough for my hand to get in. Since I have to make an opening for the fish to go into, I guess I might decide where the opening should be to convert this drum to a fish tank.


The drum will be placed on the floor in this position(it is now against the wall) with the two opening parallel to the floor. I feel that this is the best arrangement because should any one of the screw on caps (the white things) decide to leak while in operation, at least half of the water would be retained. I do not need any drain hole so I see no reason to have one right at the bottom. What do you think?


This is how I am going to make the opening at the side of the drum and when it is lying down on the floor it would be facing up. I am thinking of 15cm wide and if it is not wide enough, the maximun I would go is 30cm. I want a small opening enough for me to put my hand in to do work like sealing the leaks for starters, pump placement and off course catching the fish for the dinner table when it's time ... hehe!!! A small opening would also mean less water loss due to evaporation and more difficult for the fish to jump out to go for a walk!!!

I hope I had covered all different aspect for the conversion from drum to fish tank before I make the crucial cut.

OK the expected cost so far:
1 pc 200 litres Drum = $45.00
5 pcs 25 litres cans = $20.00
1 pc Funny Hand saw = $3.90
1 tube 300gm silicone sealant = $6.00
1 pc 600litres/hr submersible pump = ?
PVC pipes and fittings = ?


Friday, January 21, 2011

Aquaponics - The Cutting Tool


This is the tool that I found it in a unique bargain store with a unique name - Super Cowboy.

The yellow part is the handle and it is made of plastic. The black blade is a piece of hacksaw blade and it goes into the handle. The length of the exposed part of the blade can be adjusted by loosening the wing nut at the end of the handle. Very handy tool.

I got it yesterday and on the way back home I had to drop by at my mum's place to answer plumbing emergency call. Her plastic stop cock head broke and water was gushing. With the new tool in hand I used it to saw the PVC pipe and had the stop cock replaced. It worked and it is real cheap!!

OK the expected cost so far:
1 pc 200 litres Drum = $45
5 pcs 25 litres cans = $20
I pc Funny Hand saw = $3.90
1 pc 600litres/hr submersible pump = ?
PVC pipes and fittings = ?


Tuesday, January 18, 2011

Aquaponics - Committed

Went to the scrape yard and got myself committed this morning, it is getting real exciting.


Those drums filled up the Old Chariot.


I have no idea what the content of the 200 litres drum was but it didn't have any foul smell and it is really clean inside. The 25 litres drums were used for orange and apple cordials...... they smell pleasant.

It is nice to see the hardware physically as it really take away lots of the guessing work. I laid them out on the area that they were supposed to be and they fitted well. Now I have to start looking for lumber for the racks to support the grow bed and keep the 200 litres drum in place.

Next I'll have to modify the drums so that they are usable for the purpose. I have never modify a plastic drum before so I am wondering what would the best tool to cut it. A powered jig saw .... good choice but mine is broken, a blade???? These are heavy duty drums so I guess a blade is out of the question. Hmmm .... Google it!!!


Wednesday, January 12, 2011

Aquaponics - Design & Technicalities.

For the design, I am keeping it as simple as possible.


The design looks simple enough and I am sure you are aware that putting the design on paper is simple but building it is whole lot of different story. I am keeping my fingers crossed that I would not have much obstacle when I start on it physically.

Now for the technicalities, I will be following most of the information from the College of Tropical Agriculture and Human Resources, Universiti of Hawaii at Manoa in the internet and whatever useful information I can get from any website.

The Maths
The 200 litres drum for the fish need some modification work because I will be lying it on the ground. The drum need to be cut along it's side so that there is an opening. After this modification, I would expect to at least contain 180litres of water.

According to most website, to have healthy fish, the total volume of the water need to be filtered every hour which means I have to have a pump capable to move at least 180litres per hour. My plan is a 400litres per hour pump, always more is better than not enough.

As for the grow bed, the containers should be flooded every 15~20 minutes and an automated draining system is needed. To ensure that the grow beds are flooded within 15~20 minutes, the pump must be able to top up 100 litres (Since the are 5 20litres grow bed - 5X20=100) during that time. Oops I think the pump capacity is just enough and I am not comfortable with that. 400 litres per hour pump will provide a volume of 100 litres theoretically in 15 minutes. So the pump must have a larger capacity, at 600 litres I guess.

To drain the water after flooding, I think I'll go with the bell siphon system because of it's efficiency instead of the loop siphon system. Frankly I have not really make up my mind yet ..... will see how it get along ya!!

OK the expected cost so far:
1 pc 200 litres Drum = $45
5 pcs 25 litres cans = $20
1 pc 600litres/hr submersible pump = ?
PVC pipes and fittings = ?

Tuesday, January 11, 2011

Aquaponics - A Visit to the Scrap Yard

Yesterday morning I made a visit to the scrap yard to dispose of my couple of months collection of recyclable scraps. It was a good trip and I am happy with the items they have that I can make use for the aquaponics.


The 1000 litres tank is superb and at $280 per piece, is OK with me. A new tank of approximately the same capacity made of fiber glass will set me back by $800 which I will never pay for it. With the $280 one I can cut about 1 foot off from the top and I'll get two open top tanks, one about 3 feet deep which I can use for the aquaculture while the other is about a foot deep which will be ideal for the hydroponics or veggies growth bed. The smaller 25 litres tanks at $4 would be great for additional veggie growth bed without eating a hole into the pocket.

There is a problem here because I do not have the transportation to transport the tank back to my home. To arrange for hire transportation would be a hassle and I do not wish to go through that. Then a bell rang in my mind that I should actually be looking at sizes that are more portable for me to move around by myself since I might have to change the location. Moreover there are many uncertainties so I guess a smaller set up would be safer.


These 200 litres tanks is just ideal and the price at $45 I think is a steal. I have a couple of these smaller size drums at home and they do not deteriorate in the sun, maybe super slowly. To transport these 200 litres drum is no problem for me.

For the grow beds to go with this 200 litres drums, I'll make use of the 25 litres containers, maybe 4 or 5 of them.

I guess this is the most ideal set up for start up and if the project works out to be really fun then I can easily expand it base on this set up. Now to the drawing board to work out the technicalities set up design with these available hardware.


Sunday, January 9, 2011

Ham


Ham to me is a very delicious cured and cooked pork that is ready to be eaten. Chicken ham, turkey ham and whatever other ham is just nonsense. It was really difficult for me to enjoy ham in the past because of the extremely high unjustified cost so it is just look, salivate and bye bye.

I wanted to make ham earlier but was put off by the difficult and almost impossible curing process at home and in this hot tropical climate. I guess I was looking at the wrong site. Some of the sites mentioned that a curing chamber is a must to cure ham, guess they are making a different kind of ham. Anyway I was naive at making ham and all I know at that time is just to eat it.

Anyway December last year Home minister once again brought up the subject about making ham since I had success in making bacon and sausages. Hmmm....... bacon & eggs, sausages, ham also ..... wah!!! can have mat salleh breakfast almost every day huh!!! Yes, I was with Google soon enough clicking away on how to make ham. There were many sites on how to cook cured and raw ham until I came across this Making Ham At Home site. After reading through, I thought to myself that it is not as difficult as I had imagine. I guess I had been looking at the wrong place all this while.

Next is to look for the hardware required to do the job and guess what, yes they are already available and does not take up much space in the fridge. Ingredients were also already available except for the raw ham itself. Almost everything is already there and all it needed was just to put them together.


Five days later, we were enjoying the most delicious ever cooked ham for breakfast and it is really easy to do. If you ever thought of doing cooked ham at home, just do it!!

Saturday, January 8, 2011

Aquaponics - A Step Forward

A walk around the house and applying what I know about gardening, I had decided the best location for the project. The location would be on the north east portion of my home and if it is not conducive I would have it moved to another location. I decided on this area because it would not be too hot on a real hot day and since I want to plant veggies like lettuce, romaines, leeks, strawberries ........... I guess the morning sun and the not too hot environment is preferred. 


The fish tank would be located where those old cooking pots are, I am using them to store earth and compost for potting. There is hardly any sunshine here so I do not have to deal with unwanted algae growth and I guess the fish will be more comfortable in cool environment.

The grow beds will be located under the windows where they will get the maximun amount of morning to noon sunshine. The plants that I have there now are scallion, sage, "sleeping" bay leaf and rosemary.

The set up have to be able to be moved if need be because the location might not be suitable and since this is my first time, I guess I had to go on with a comfortable size that I can handle. If all goes well, then there can always be the expansion program

Wednesday, January 5, 2011

Aquaponics - Decisions, decisions, decisions.........

After having done the research on aquaponics, I was surprised to find that there are many types of set up. I decided to go with the media base flood and drain design. There are still many alternative base on this design and I guess I’ll decide as I go along. I am aiming to do it at a minimum cost. Next is to find the best location to set up the system in my compound.  

Took a slow walk around my house today to decide where should I locate this aquaponics project. Never knew that it is so difficult to decide where would be a good spot.

My house is sitting on a almost rectangular piece of land facing south. The backyard is small after having the kitchen extended. From wall to fence is about 15feet and it gets sunshine almost the whole day. It would be great if I can make use of this space which is about 40 plus feet long but beyond the fence is a family of brainless, filthy, inconsiderate, @#$%&*$#@ thing. They use weed killers to kill the weeds along the fence with no consideration to the neighbours plants and had their dog jailed in a very small prison cell 24/7, not to mention their rubbish.....yucks!!!! So I guess the backyard is out of the question unless I want another unpleasant incident.

Looking from the front portion of the house, east is on the right and west on the left. The east side from the front side all along the front gate to the house is the drive way and thereafter is the car porch area which extend almost to the back of the house. Here I get about 3~4 hours of morning sunshine because of the close proximity of the neighbour on this side.

On the west side, the morning sun is shaded by my house and only the mid-day to evening sun is available here. Mid-day sun is scorching almost every sunny day and I used to have some potted plants there and they did not grow well due to the pots getting heated up. Hmmm.... if I can keep the temperature of the water in aquaponic cool maybe I can counter this problem.

The front yard, there is lots of space but lots of finance is required ..... sheds, plumbing and electrical wiring. Tough, tough, tough ..... need to decide soon so that I can start on the setup plans next.


The west side???????? 

Monday, January 3, 2011

Aquaponics - The First Step

When I first started organic veggie gardening some of the veggies that I wanted to grow were those that are not commonly planted in this part of the world because of the climate. My curiosity got the better part of me and I tried many ways trying to grow them here. When traditional method failed, I started to think of hydroponic.

Hydroponics is a subset of hydro-culture and is a method of growing plants using mineral nutrient solutions, in water, without soil. The minerals nutrients are in the form of chemicals and I wanted a organic method where almost all my needs can be obtained easily around the house. Made lots of research on the internet and after some discussion with one of the member in the Garden Stew forum, I was introduced to Aquaponics.

Aquaponics is a system of aquaculture in which the waste produced by farmed fish or other aquatic creatures supplies the nutrients for plants grown hydroponically, which in turn purify the water. This is like a mini ecosystem and as long as there is a balance it should be great. Yes this is interesting and could be the solution for me to plant the temperate veggies that I wanted to plant. 


Having decided the next step is to get more information on this system and also to where to locate it in my compound.                

Saturday, January 1, 2011

2011

A great shot by my son
2011, a brand new year and a new decade in the millenium. 2010 had been a great year for me and I am sure 2011 will be too! No sciatica, yummie braised pork leg, made bacon after wanting to for a couple of years, sausages .....also yummie!! Got my Intel i7 computer which is actual a project originally planned for this year. Original plan was a Intel i5 but with such great tempting price ......... it is now history. My princess is also now in the vicious economy eco-system full time, somewhere near the middle of the food chain. I harvested my very first luffa from my mini farm and also the sweetest of the sweetest sweet corn you can ever imagined. Yes 2010 was a great year.

I am looking forward to materialising my ideas for 2011 because the brain is already working overtime on some project for this year. The most interesting project I guess would be aquaponics and I am really excited about it. A project that is already on it's way is making cooked ham ........ a couple of days more and YUMMIE time!!!!!